Search This Blog

Wednesday, January 20, 2016

Line - How to use same Line account on both Smartphone and Desktop - ไลน์ วิธีใช้ไลน์บนมือถือและเดสท็อป

Line on Desktop is very useful since it allows you to drag file on to the chat, then you can send that file to your friend or even your Line account on the smartphone. Moreover, it gives more chat power to you since you can type text through desktop keyboard. There are few steps below to use Line on Desktop. *All friend and chat info will sync to your desktop.

ไลน์แอพ บนเดสท็อป หรือ เครื่อง PC/Laptop มีประโยชน์มากครับ นอกจากช่วยให้ chat ได้อย่างเมามันส์ด้วยการพิมพ์จากคีย์บอร์ดของเครื่องเดสท็อปแล้ว ยังสามารถลากไฟล์วางในห้องสนทนา (Chat) เพื่อส่งไฟล์ให้เพื่อนได้โดยง่าย มาดูวิธีง่ายๆ ไม่กี่ขั้นตอนก็สามารถใช้ Line account เดียวกันทั้งบนมือถือและเดสท็อปครับ
*ข้อมูลไลน์บน smartphone จะซิงค์กับบน Desktop ด้วย

1. Access to your Line App on your smartphone and touch on right end tab.
เปิดไลน์ในโทรศัพท์มือถือแล้วจิ้มที่แท็ปขวาสุด

2. Touch on setting
จิ้มที่ Setting

3. Hit on "Account"
จิ้มที่ "Account"

4. Touch on "Email Account Registration"
จิ้มที่ "Email Account Registration"

5.Fill in your email ID and create new password (This password will be using for Line Desktop login and will not related to your email account, so you can create new password and no need to use your existing email password.)
กรอกอีเมล์ และสร้างรหัสผ่านใหม่ (ไม่จำเป็นต้องเป็นรหัสผ่านเดียวกับอีเมล์) 

6. Go to your Desktop and open Line App and login with your email ID and password that you just registered on the smartphone. Now, you can enjoy same Line account on your desktop.
จากนั้นเปิดไลน์ที่เครื่องเดสท็อป แล้วล็อกอินด้วย อีเมล์และรหัสผ่านที่สร้างบนโทรศัพท์มือถือในขั้นตอนที่ 5 แล้วคุณก็สามารถเริ่มการแช็ตบนเครื่องเดสท็อปได้เลย

Note: If you haven't got Line App installed on your desktop, you can download it from http://line.me/th/download . Please find step to download and install Line App on my next post.
หมายเหตุ: ถ้าหากยังมีไลน์แอพ ติดตั้งบนเครื่องเดสท็อป สามารถดาวน์โหลดได้จาก http://line.me/th/download และติดตามวิธีการติดตั้งได้ในโพสต่อไปครับ

Thursday, January 14, 2016

Line - How to hide post from your friend on your timeline - วิธีซ่อน post ขายของบน timeline ของคุณ

ท่านผู้ใช้ไลน์หลายๆ ท่านอาจรู้สึกรำคาญกับ post ของเพื่อน (Friend) บางคน ที่ post ขายของบ่อยเกินไป (แทบจะทุกชั่วโมง) จนไม่เห็น post ของคนอื่นบ้างเลย และ Post เหล่านั้นยังไปโผล่บน timeline ของเพื่อนๆ คุณด้วย มาดูวิธีซ่อน Post ของ เพื่อนคนนั้นๆ จาก timeline ของคุณด้วยวิธีง่ายๆ กันครับ

Line users may feel annoying with some of your friend who keep posting on every hour or minute. And So bad that these posts also show on other of your friend's timeline. See how to hide all post from that friend below (Only 3 steps).

1. จิ้มที่รูปนาฬิกาที่ด้านบนของไลน์ (Touch on "Clock icon" on top of your Line App.)

2. จิ้มที่ชื่อเพื่อน (ไม่ใช่ที่รูปไอคอน) ค้างไว้สักครู่ (Touch and hold on the friend name ... not at the friend's icon... just for a second.)

3. จิ้มที่ข้อความ "Hide from timeline" รายการเมนูที่เปิดขึ้น Post ทั้งหมดของเพื่อนคนนี้จะหายไปทันที (Once the menu open, touch on "Hide from timeline", all posts from this friend will be hidden from your timeline)

Note: To all of my Line friends, please don't use this instruction to me. I promise that I will not post at that often.
เรียนเพื่อนไลน์ของผมทุกท่าน กรุณาอย่าใช้วิธีนี้กับผมนะครับเพราะผมสัญญาว่าจะไม่โพสอะไรถี่ขนาดนั้น

Tuesday, January 12, 2016

Line - You can search your text conversation in your line app - วิธีค้นหาข้อความที่เคยคุยกับเพื่อนในไลน์

ไลน์ - หลายๆ ท่านคงจะนิยมใช้ไลน์ ในการคุยเรื่องราวต่างๆ กับเพื่อนหรือ ในการทำงาน แต่เมื่อเวลาผ่านเลยไป ข้อความนั้นๆ จะถูกดันขึ้นไปข้างบนหน้าจอ เวลาค้นหาอาจจะต้องใช้นิ้วรูดหน้าจอ ยาวๆ เพื่อย้อนกลับไปดูที่ข้อความนั้นๆ และบางครั้งก็ลืม หรือหาไม่เจอซะด้วย เพราะผ่านไปหลายวันและมีข้อความใหม่ๆ เข้ามาเยอะแยะมากมาย
ลองใช้ฟังก์ชั่น search ที่เป็นรูปแว่นขยายที่อยู่ด้านบนของหน้าจอไลน์ดูครับ ฟังก์ชั่นนี้ช่วย search ทุกอย่างที่เป็น Text (ข้อความที่เราพิมพ์ไว้) หรือแม้แต่ชื่อไลน์ของเพื่อนที่บางครั้งเราก็หาไม่เจอ เนื่องจากมีเพื่อนในไลน์มากมาย

มาดูวิธีการใช้แบบง่ายๆ กันครับ (Below shows instruction to search for text conversation in Line App)

1. คลิกที่รูปแว่นขยายส่วนบนสุดของ แอพไลน์ (Click on magnifier icon on top of Line App page)
 

2. พิมพ์ คำค้น (Keyword) ที่ต้องการค้นหาลงไปในช่องนี้  โดยเมื่อพิมพ์เสร็จผลการค้นหาด้วยคำค้นจะแสดงให้เห็นว่ามีห้องสนทนาใดมีข้อความตามคำค้นบ้าง (Type in keyword to the search box. Then the search result will shows under the search box and also display number of message in each chat room that contain the keyword.)


3. จิ้มไปที่ห้องสนทนาที่ต้องการ จะเห็นข้อความที่เคยคุยกับเพื่อนแต่ละคนที่มี คำค้นที่เราพิมพ์ลงไป จะแสดงขึ้นมาทั้งหมด (Touch on the chat room that you want to see list of message in that chat room.)


4. เลือกโดยจิ้มไปที่ข้อความที่ต้องการ เพื่อเข้าไปดูรายละเอียด ซึ่งในรายละเอียดจะมีการแรเงาคำค้นที่เราใช้ในการค้นหาให้ด้วย (Touch the message to see the detail. The keyword will be highlighted.)

Thursday, December 31, 2015

Line - How to save photo from website to your smartphone and send via Line app- วิธีบันทึกรูปจากเว็บไซต์ลงในโทรศัพท์มือถือแบบ smartphone และส่งทางไลน์

วิธีการบันทึกรูปจากเว็บไซต์ลงโทรศัพท์มือถือและส่งให้เพื่อนทางไลน์ (Instruction to download image from website to your smartphone and send to your friend line.)

วิธีดาวน์โหลดรูปจาก Free download Photo by GME ลงบนโทรศัพท์มือถือ (Instruction to download the image to your mobile phone.)
1.เปิดเว็บไซต์
2.ใช้นิ้วจิ้มที่หัวหมวดหมู่รูปที่ต้องการ (หัวเรื่อง) (Click on image category that you want.)
3.ใช้นิ้วจิ้มหนึ่งครั้งที่รูปที่ต้องการ (Then, click on the image that you want.)


4.เมื่อรูปที่ต้องการขยายใหญ่ขึ้น ให้ใช้นิ้วจิ้มที่รูปค้างไว้ จนมีเมนูแสดงขึ้นมา (Once the image become full screen, click and hold on the image until menu display.)


ให้ใช้นิ้วจิ้มที่ "Save image" รูปจะถูกบันทึกในเครื่องโทรศัพท์ ให้สังเกตที่ด้านล่างของรูปจะมีข้อความ "Downloading" เมื่อข้อความนี้หายไปแสดงว่าการดาวน์โหลดเสร็จสิ้นแล้ว (จบขั้นตอน)
(Click on "Save image", the image then, save to your mobile phone. During it save, the message "Downloading" will display.)

วิธีส่งรูปที่ดาวน์โหลดมาแล้วเข้าไลน์ (Instruction to send the download image to your friend through Line application)
1.เปิดไลน์ของคุณ (Accessing to your Line application)

2.เลือกชื่อเพื่อนหรือกลุ่มที่ต้องการจะส่งภาพนี้ (Select friend name or group name, that you want to send this image to)
3.คลิกที่เครื่องหมาย + ที่ด้านซ้ายมือ (Click on plus sign (+) on left end of message box)


4.เลือก "Choose Photo" (Click on Choose Photo)


5.เลือก "All Photos" (Select "All photos")


6.เลือกรูปที่ต้องการ (Select the image)


7.จะตกแต่งรูปก่อนด้วยฟังก์ชั่นตกแต่งรูปของไลน์ก็ได้ หรือกดปุ่ม Send เพื่อส่งรูปเข้าห้อง Chat เลยก็ได้ (You can put effect to the image before send using Line's function, or click "Send" to send the image immediately"


Friday, December 4, 2015

Gmail - receive many email accounts under one gmail account - วิธีรับหลายอีเมล์ ได้ใน gmail เดียว

ผมมั่นใจว่าหลายๆ คนคงจะชอบใช้ gmail เป็นอีเมล์หลัก เนื่องจากมี app ให้ใช้ได้อย่างสะดวกบน iphone และ android และหลายๆ คนยังมี อีเมล์ภายใต้โดเมนอื่นๆ อีกหลายอีเมล์แน่ๆ  เช่น นอกจากมี gmail แล้ว ยังมี hotmail, yahoomail รวมทั้ง เมล์ที่ได้จากการเปิดเว็บไซต์ของตัวเอง ลองมาดูวิธี รวมทุกอีเมล์ ให้มาอยู่ใน gmail เดียว คือ รับอีเมล์ จากทุกเมล์โดเมน เช่น สามารถเปิด เมล์ของ hotmail ใน gmail หรือ เปิดเมล์ของ yahoomail ใน gmail

มาดูวิธีตั้งค่าให้ gmail ของคุณให้ทำแบบที่กล่าวมาข้างต้นนี้กันครับ (ไม่ยากครับ มีไม่กี่ขั้นตอน)

1.ล็อกอินที่ gmail ของคุณ

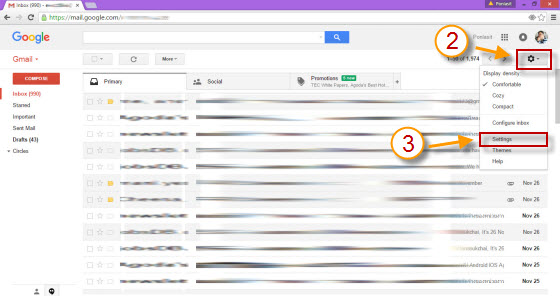
2.คลิกที่เครื่องหมาย เกียร์
3.คลิกที่เมนู Settings


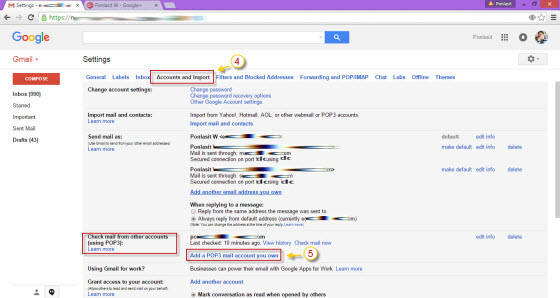
4.คลิกที่แท็ป "Accounts and Import"
5.ดูที่หมวด "Check mail from other accounts" ให้คลิกที่ "Add a POP3 mail account you own" จะมีหน้าต่างเพิ่มเมล์ใหม่ปรากฎขึ้นมา


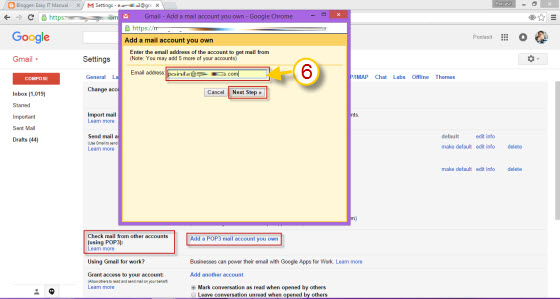
6.กรอกอีเมล์ ที่คุณต้องการเพิ่มเข้ามาใน gmail นี้ เช่น ponlasit@easyitmanual.com แล้วคลิกปุ่ม "Next Step >>"


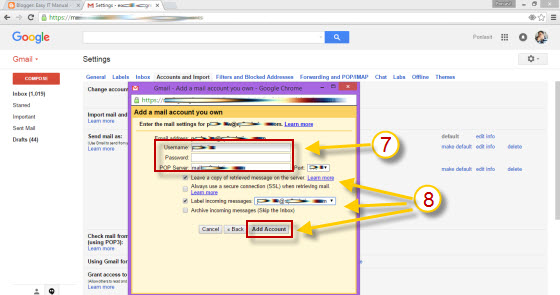
7.กรอก username และ password ของเมล์ ที่คุณจะนำเข้ามารวม ลงในช่อง Username และ Password
แล้วกรอก POP Server หากไม่ทราบอาจต้องถามจาก admin ของเมล์ นะครับ ซึ่งส่วนใหญ่ จะขึ้นต้นด้วย "mail.อีเมล์โดเมนของคุณ"

8. จากนั้นคลิกที่กล่องสี่เหลี่ยมหน้าข้อความ "Leave a copy of retrieved message on the server" เผื่อวันหลังจะเข้าไปเช็คเมล์ ในอีเมล์ที่ดึงมา แล้วคลิกที่ช่องสี่เหลี่ยมหน้าข้อความ "Label incoming message" และเลือกเป็นชื่ออีเมล์ที่คุณดึงเข้ามา แล้วคลิกปุ่ม "Add Account" หน้าต่างเพิ่มเมล์ใหม่จะปิดไป


9.จะเห็นได้ว่าด้านขวามือของช่อง "Check mail from another account" จะมีชื่อเมล์อันใหม่ของคุณที่เพิ่งเพิ่มปรากฎขึน ซึ่งหากต้องการแก้ไขการตั้งค่า คลิก edit หรือต้องการยกเลิก การดึงเมล์นี้เข้ามาใน gmail ให้คลิก Delete 


จบขั้นตอนการดึงเมล์ เข้ามาเพิ่มใน gmail แล้วครับ ลองเปิดดูที่ inbox จะพบว่าเมล์จาก อีเมล์ที่เพิ่งดึงเข้ามาจะทยอย เข้ามาใน inbox ของ gmail ของคุณ

Saturday, November 28, 2015

Gmail - Set up mail signature - วิธีตั้งค่า คำลงท้ายจดหมายใน gmail


ใครที่ใช้ gmail อยู่ และไม่อยากที่จะต้องเขียนคำลงท้ายจดหมายทุกครั้ง สามารถกำหนดค่าในหน้า setting ของ gmail ได้

(คำลงท้าย เช่น ...

"ขอบคุณครับ
  พลสิทธิ์ วัฒน...
  08x xxx xxxx"   )

วิธีตั้งค่าทำตามนี้เลยครับ

*We have moved to the following website.

http://www.knowledgeandfun.com/2017/07/set-up-mail-signature-in-gmail-gmail.html


Friday, November 20, 2015

Excel - Lessons of Excel Makes Your Work Easy - รวมบทเรียนงานง่ายด้วย Excel


เกี่ยวกับบทความนี้ | About this article
  • Count by condition - นับจำนวนตามเงื่อนไข
  • Get last 4 characters - เลือกอักษรสี่ตัวสุดท้าย
  • Cut the beginning characters - ตัดอักษรตัวหน้า
  • Add space in text - เพิ่มช่องว่างในชื่อ
  • Merge columns - รวมคอลัมภ์
  • Text to columns - แยกคอลัมภ์
  • Sort name by character - เรียงชื่อตามตัวอักษร
  • Sort by color - เรียงตามสี
  • Filters - เลือกตามเงื่อนไข
  • Check duplication - หาชื่อซ้ำ
  • เกี่ยวกับบทความนี้ | About this article

    งานง่ายด้วย Excel
    จัดทำจากประสบการณ์การใช้โปรแกรมไมโครซอฟต์เอ็กเซล ในการทำงานหน้าที่ผู้จัดการโครงการฯ (IT Project Manager) มากว่า 7 ปี ซึ่งต้องนำโปรแกรมเอ็กเซลมาประยุกต์ในการทำงานหลากหลายรูปแบบ ตั้งแต่ใช้ในการจัดทำแผนงานโครงการ ร่วมกับโปรแกรมไมโครซอฟต์โปรเจค การใช้งานเอ็กเซลในการบันทึกเหตุการณ์ต่างๆ (issue log) ที่เกิดขึ้นในระหว่างการดำเนินโครงการ หรือแม้แต่การใช้โปรแกรมเอ็กเซลช่วยจัดระเบียบข้อมูลที่ลูกค้านำออกจากระบบเดิมก่อนส่งให้โปรแกรมเมอร์นำข้อมูลเข้าสู่ระบบใหม่ ทั้งนี้สามารถช่วยลดงานการเขียนโปรแกรมของโปรแกรมเมอร์ได้เป็นอย่างมาก ผู้ที่ต้องการเพิ่มประสิทธิภาพในการทำงานของตนเอง จึงควรเรียนรู้เทคนิคการประยุกต์ใช้โปรแกรมเอ็กเซลกับงานของตนเองเป็นอย่างยิ่ง
    ==================================
    Excel makes your work easy
    This topic is about how-to apply Excel for your work. I share this from my experience that i have worked with huge data like three thousand of record of users including their relevant information. My task was to help my programmer team to prepare data before importing to new system. To avoid heavy task for programmer, I decided to use Excel to help preparing data by removing duplication record, removing in-relevant text and make proper format according to new system format required.
    I also have experience to help my office admin to improve the Excel skill to make her job easier.
    Finally, for this topic, I intend to share my Excel experience in order to help new graduate and also person who has a basic knowledge of Excel and other who are interested in using Excel.